Thursday, November 9, 2017

Fedora Setup

Fedora 24 Setup


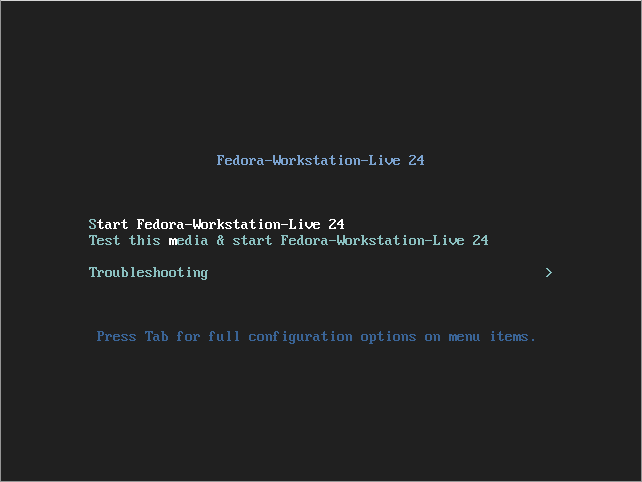
  • Insert DVD and reboot.

  • Fedora 24 Boot Screen
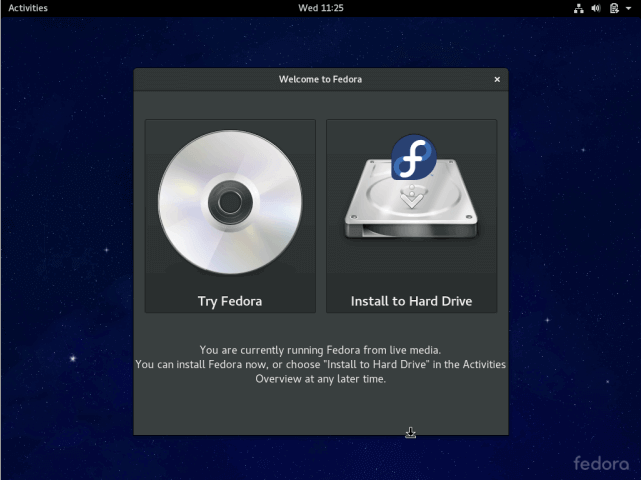
    • Select "Install to Hard Drive"
    Install Fedora 24 to Hard Drive
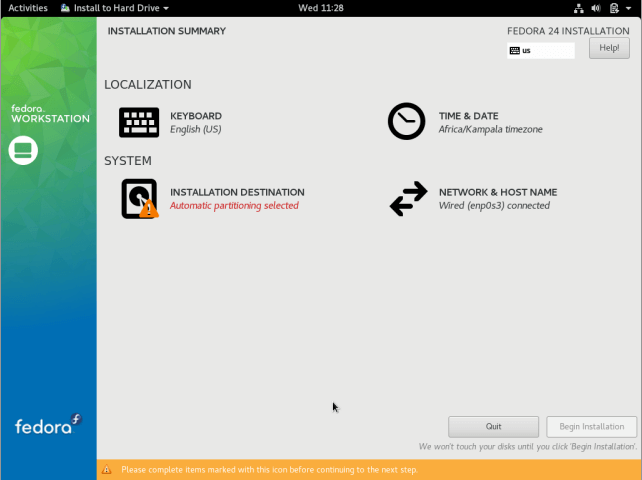
    • Select "Installation destination"
    Fedora 24 Installation Summary

    • Select a device, "Automatically configure partitioning", and "I would like to make additional space available".
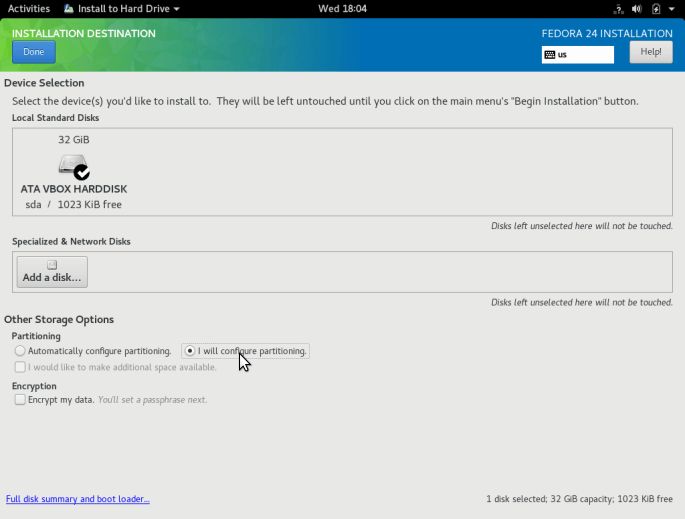
    Configure Fedora 24 Installation Destination

    • Go back to "Installation Summary" and select "Network and Host Name"
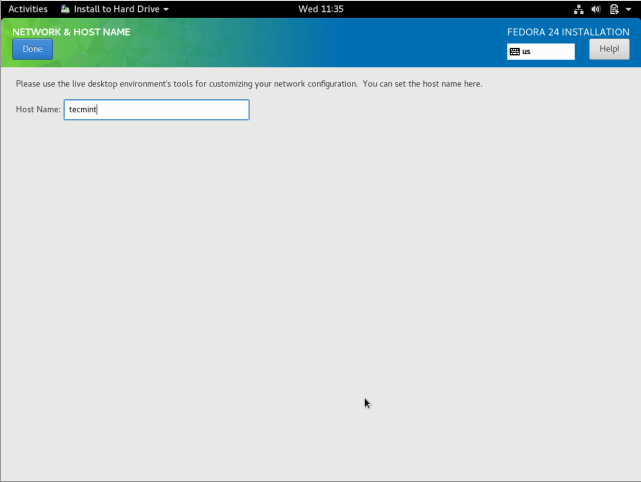
    • Give a host name
    Configure Network Hostname
    • Select "Begin Installation" to continue.
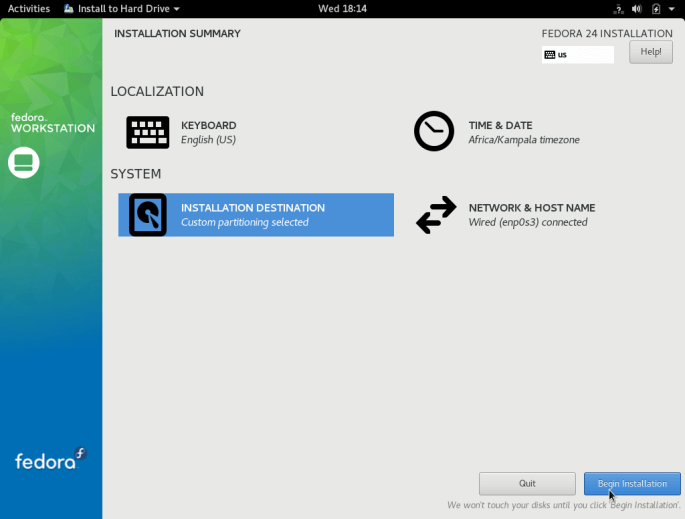
    Begin Fedora 24 Installation
    • As the system files are being installed, setup root password and setup user.
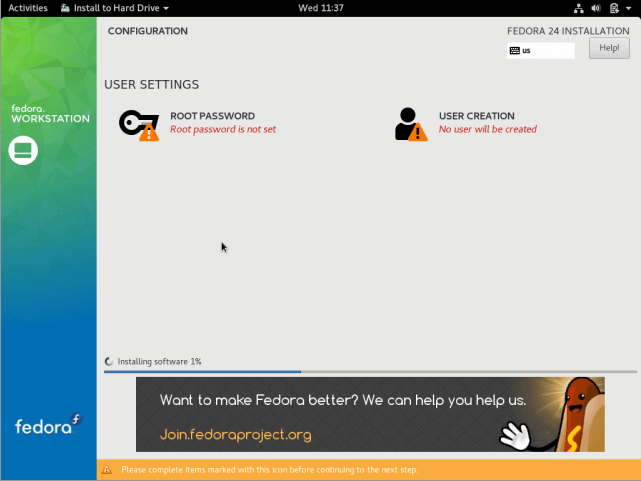
    Setup Fedora 24 Users
    • Once installation is completed, remove the media and reboot
    • dnf update to update installed packages
    • Reboot
    • vi /etc/sysconfig/selinux to "disabled"
      • If cannot login with NIS (specially with Fedora 26), re-enable (enforce) selinux
      • If you want to use samba, do this:
        setsebool -P samba_export_all_rw 1
    • Stop & disable firewalld.service unless you want to use firewall
    • If you need to use NIS in OpenTV:
      • dnf install ypbind rpcbind
      • /etc/nfsmount.conf
        • Defaultvers=3
      • ypdomainname hq.k.grp
      • /etc/sysconfig/authconfig
        • USENIS=yes
      • /etc/yp.conf
        • domain hq.k.grp server 10.4.50.16
        • domain hq.k.grp server 10.4.50.17
      • /etc/nsswitch.conf
        • passwd: add nis
        • shadow: comment out
        • group: add nis
        • netgroup: nis sss
        • automount: files nis sss
      • systemctl enable rpcbind ypbind and reboot

    • autofs
      • dnf install autofs
      • /etc/sysconfig/autofs
        • BROWSE_MODE="yes"
      • /etc/auto.master
        • auto.master.mtvlnx
      • /etc/resolv.conf
        • search hq.k.grp
        • nameserver 10.4.40.7
        • nameserver 10.4.20.46
      • systemctl enable & start autofs.service

    • samba
      • dnf install samba
      • vi /etc/samba/smb.conf

         [global]
         workgroup = HQ
         server string = yjpark_linux

              security = user 


              [homes]

              comment = Home Directories

              valid users = %S, %D%w%S

              browseable = Yes

              writable = yes

              inherit acls = Yes
    • To export other than user home directory, e.g. /home/yjpark:

         [test]
         comment = test directory
         path = /home/test
         public = yes
         writable = yes

              browseable = Yes
      • systemctl smb restart
      • smbpasswd -a user_id
      • If firewalld is enabled:
        • firewall-cmd --permanent --add-service=samba
        • service firewalld restart
    • Apach
      • systemctl enable/start httpd.service
      • default html documents are in /var/www/html
    • Docker CE
      • dnf install dnf-plugins-core
      • dnf config-manager --add-repo https://download.docker.com/linux/fedora/docker-ce.repo
      • dnf install docker-ce
    • Add user to docker
      • groupadd docker
      • gpasswd -a yjpark docker
      • usermod -aG docker yjpark
    • docker-compose upgrade
      • curl -L https://github.com/docker/compose/releases/download/1.17.0/docker-compose-`uname -s`-`uname -m` -o /usr/local/bin/docker-compose
      • replace /usr/bin/docker-compose
    • docker registry
      • docker pull registry:2
      • docker run -d -p 5000:5000 --restart always --name registry registry:2
      • vi /etc/docker/daemon.json
    {
      "insecure-registries":["10.0.0.211:5000"]
    }
      • systemctl restart docker
      • push docker image
        • vi Dockerfile

    FROM ubuntu:12.04

    CMD while true; do echo 'Hit CTRL+C'; sleep 1; done

        • docker build -t docker_test_1 .
        • docker run --rm -it docker_test_1
        • docker tag docker_test_1 10.0.0.211:5000/docker_test_1
        • docker push 10.0.0.211:5000/docker_test_1
      • pull docker image
        • CE:
          • vi /etc/docker/daemon.json
    {
      "insecure-registries":["10.0.0.211:5000"]
    }
          • Older:
      INSECURE_REGISTRY='--insecure-registry 10.0.0.211:5000'
          • systemctl restart docker
          • docker pull 10.0.0.211:5000/docker_test_1
          • docker tag 10.0.0.211:5000/docker_test_1 docker_test_1
          • lookup
            • curl 'http://10.0.0.211:5000/v2/_catalog'
          • stop registry
            • docker stop registry
          • cleanup registry
            • docker rm -v registry
      • docker swarm
        • docker swarm init --listen-addr 0.0.0.0:2377 --advertise-addr 10.0.0.211
        • docker swarm join-token manager
        • docker swarm join-token worker
        • docker swarm join --manager --listen-addr 0.0.0.0:2377 10.0.0.211:2377
        • In different machine, docker swarm join --token SWMTKN-1-28hbo372s2s7vqksqu95xjka1tlq2u44cyzxeu7nkp510nfhbs-0qcw90bwph9vph3pmg45wqbfi 10.0.0.211:2377
        • docker node ls
        • docker node update --label-add nodelabel=ubuntu dqviprkfsjriozb7a37n5ccvt
        • docker node inspect dqviprkfsjriozb7a37n5ccvt
        • docker service create --replicas 2 --detach=false --name docker_test 10.0.0.211:5000/docker_test_1
        • docker service ls

      ID                  NAME                MODE                REPLICAS            IMAGE                                  PORTS

      o29rus4yn3m5        docker_test         replicated          2/2                 10.0.0.211:5000/docker_test_1:latest   

        • docker service ps o29rus4yn3m5        
      ID                  NAME                IMAGE                                  NODE                DESIRED STATE       CURRENT STATE           ERROR               PORTS
      a5ea1hinp1s6        docker_test.1       10.0.0.211:5000/docker_test_1:latest   yjpark-linux-01     Running             Running 2 minutes ago                       
      ce41xdqa9ef5        docker_test.2       10.0.0.211:5000/docker_test_1:latest   Ubuntu-VirtualBox   Running             Running 2 minutes ago                       
        • docker service logs a5ea1hinp1s6
        • docker service scale docker_test=1
        • docker service rm o29rus4yn3m5
      • virtualbox
        • download https://www.virtualbox.org/wiki/Download_Old_Builds_5_1
        • dnf install kernel-devel
        • /sbin/vboxconfig
        • Download ubuntu iso file
        • Create new vm
      • Perforce
        • download p4d from https://www.perforce.com/downloads/helix-versioning-engine-p4d
        • vi /etc/systemd/system/p4d.service
      # Example Perforce systemd file (p4d.service):
      #
      # This service file will start Perforce at boot, and
      # provide everything needed to use systemctl to control
      # the Perforce server process.
      
      [Unit]
      # Note that descriptions are limited to 80 characters:
      Description=Perforce Server
      
      # Starts Perforce only after the network services are 
      # ready:
      #After=network.target
      After=network-online.target
      
      [Service]
      # The type should always be set to "forking" to support
      # multiple Perforce processes:
      Type=forking
      
      # Set the system user used to launch this process (usually
      # 'perforce':
      User=perforce
      
      # The command used to start Perforce:
      ExecStart=/usr/bin/p4d -r /home/yjpark/p4d/p4d -p 10.0.0.211:1666 -d
      
      [Install]
      # Describes the target for this service -- this will always
      # be 'multi-user.target':
      WantedBy=multi-user.target
        • systemctrl start p4d
        • systemctl enable p4d
          • a symbolic link to p4d.service file will be created in /etc/systemd/system/multi-user.target.wants
        • download p4v from https://www.perforce.com/downloads/helix-visual-client-p4v
        • create a symbolic link to p4v in /usr/local/bin.
      • git
        • git user:
          • ssh-keygen -t rsa -b 2048
          • sudo adduser git
          • cd /home/git
          • su git
          • mkdir git-shell-commands
          • sudo vi /etc/passwd, change bash to git-shell
          • sudo -u git -s
          • mkdir .ssh
          • chmod 700 .ssh
          • cat ./id_rsa.pub >> ./authorized_keys
          • chmod 600 ./authorized_keys
          • rm -rf ./id_rsa.pub
          • cd /home/git
          • mkdir repos
          • cd repos
          • mkdir test_project.git
          • cd test_project.git
          • git init --bare --shared
        • user:
          • git config --global user.name "yjpark"
          • git config --global user.email "yongjin.park.kr@gmail.com"
          • cd git/workspace
          • git clone ssh://git@10.0.0.211:/home/git/repos/test_project.git
          • cd test_projec
          • vi test.py
          • git add .
          • git status
          • git commit -a -m "initial commit"
          • git push origin master
          • git status
      • Jenkins
        • In the staging server:
          • Setup staging Jenkins server and install plugins
          • curl -sSL "http://user:pass@10.0.0.211:8080/pluginManager/api/xml?depth=1&xpath=/*/*/shortName|/*/*/version&wrapper=plugins" | perl -pe 's/.*?<shortName>([\w-]+).*?<version>([^<]+)()(<\/\w+>)+/\1 \2\n/g'|sed 's/ /:/' > plugins.txt
        • In the target server (VM), using a Jenkins job:
          • sync workspace in Perforce, e.g. /home/perforce/workspace/jenkins/, which has a Dockerfile and plugins.txt (see above) in it
          • Dockerfile example:
      FROM jenkins/jenkins
      COPY plugins.txt /usr/share/jenkins/ref/plugins.txt
      RUN /usr/local/bin/install-plugins.sh < /usr/share/jenkins/ref/plugins.txt
          • mkdir /home/jk
          • docker build -t 10.0.0.211:5000/jenkins .
          • docker push 10.0.0.211:5000/jenkins
          • docker run -p 8090:8080 -p 50000:50000 -v /home/jk:/var/jenkins_home 10.0.0.211:5000/jenkins

      Saturday, June 24, 2017

      Node.js


      • exports
      exports.area = function (r) {// foo.js
      • OOP
      Duck.prototype = {module.exports = Duck;

      var RedDuck = function(name, nums){RedDuck.prototype = new Duck();
      // MallardDuck.jsvar MallardDuck = function(name, nums){MallardDuck.prototype = new Duck();MallardDuck.prototype.constructor =  MallardDuck;
      // main.jsvar RedDuck = require('./RedDuck');var a = new MallardDuck("mallard",[1,1,1]);a.swim();var b = new RedDuck("red",[2,2,2]);b.swim();
      // circle.js
      var PI = Math.PI

        return PI * r * r;
      };

      var circle = require('./circle.js');
      console.log(circle.area(4));


      // Duck.js
      var Duck = function( name, nums ){
          this.name = name;
          this.nums = nums; // ë°°ì—´
      };

          swim : function() {
              console.log("swim!!");
          },
          getName : function(){
              return this.name;
          },
          getNumList : function(){
              return this.nums;
          }
      };


      // RedDuck.js
      var Duck = require('./Duck');

          Duck.call( this, name, nums );
      };

      RedDuck.prototype.constructor = RedDuck;


      module.exports = RedDuck;

      var Duck = require('./Duck');

          console.log(arguments);
          Duck.apply( this, arguments );
      };

      // 함수 Override
      MallardDuck.prototype.swim = function () {
          console.log("MallardDuck swim!!!")
      };


      module.exports = MallardDuck;

      var Duck = require('./Duck');

      var MallardDuck = require('./MallardDuck');


      console.log(a.getName());
      console.log(a.getNumList());


      console.log(b.getName());

      console.log(b.getNumList())


      • Swagger
        • swagger project create <name>
        • in app.js:
      var SwaggerUi = require('swagger-tools/middleware/swagger-ui');

      in create():
      app.use(SwaggerUi(swaggerExpress.runner.swagger));

      • create settings.js in config:

      module.exports = {
        db: 'mongodb://mongo/vote',
        port: '9100',
      };

      • create directory "models"
        • create index.js

      var mongoose = require('mongoose');
      var settings = require('../config/settings');

      mongoose.connect(settings.db, function (err) {
        if (err) {
          console.error('connect to %s error: ', settings.db, err.message);
          process.exit(1);
        }
      });

      // models
      require('./vote');

      var Vote = mongoose.model('Vote');

      module.exports = {Vote};


        • create vote.js

      var mongoose = require('mongoose');
      var Schema = mongoose.Schema;

      var VoteSchema = new Schema({
        Result: Number
      });

      module.exports = mongoose.model('Vote', VoteSchema);


      Monday, May 29, 2017

      STB Software


      • Why PCR – Program Clock Reference is required?
        • Already, we know that STC channel is connected to the PCR pid channel. The STC – System Time Clock runs at 27MHz. It is the speed at which the encoding is done at the transmitting side. However, the receiver – STB cannot run at 27MHz to decode the stream because the oscillator is prone to errors (+/- tolerance level). In order to generate the accurate timings, a PCR is feed to STC – System Time Clock. Thus, with the aid of PCR, we can reduce the jitter and macro-blocks at the receiver side.
      • How does System Time Clock – STC is used for decoding?
        • If the frame – DTS – Decoding Time Stamp is equal to the System Time Clock, then only the frame is decoded.
        • If the frame – PTS – Presentation Time Stamp is equal to the System Time Clock, then only the frame is presented.
      • How is “Time Stamp Management” done in STB?
        • For live feed, the PCR is feed to the STC for playing the Stream – Audio and Video.
        • For PVR, the STC is free running. It means that the STC is locked to the system clock. In this scenario, the STB will ignore the DTS and PTS.
      • What problems can occur due to PCR errors?
        • A lip-sync i.e. mismatch between the video frame and the audio may occur.
        • A jitter or macro-blocks may occur due to the lack of PCR. When there is an error/noise in the transmission, we will see a frequent PTS errors i.e. the Presentation Time Stamp (PTS) is not in sync with the STC – PCR.
      • How do we troubleshoot a macro-block/jitter/jerk issue in STB?
        • Check for the Signal/Noise ratio. If found issues over there, then try to rectify the tuner locking process.
        • If the issue cannot be fixed at the tuner side due to the transmission error, then try to fix in the STC sourcing.
          • For the live mode, you can configure the STC in the following mode. If the PCR has high jitters, then the STC will decouple from the PCR source. In such a case, the STC will use the internal crystal clock. Later, once the jitter is low, the STC will be feed with the PCR.
          • For the PVR mode, the STC is configured to a free running mode. In this case, the STC will be feed with the system clock. Also, the decoder will ignore the DTS and PTS. It’s up to decoder to correctly decode the frames. It is same like playing a MPEG stream with a player – like VLC media player.
        • Also, sometimes the jitter/macro-block is due to the reason that Video RAM is full. In such a case, we can re-configure the Video RAM to decode the frames successfully.
          • [note] – For pull-vod, the mode is RTP – real time protocol. With the help of RTP, we can do trick modes on the IP stream.
          • Some typical steps to troubleshoot Macro-blocking issues –
            • List down the services where the problem is seen. Please note down the frequencies of those problematic services.
            • Now, check the SNR and Inband power level. Look at the STB specifications –
                         QAM256 (InBand)
                         min -12dBmV
                         max +15dBmV
                         Min SNR 33dB

            • Check for the Video decoder errors
              • Sometimes, the issue is due to the video memory buffer overflow. Also, it could be due to the PTS errors.
      • What is a PES – Packetised Elementary Streams?
        • A PES is a audio, video, and data packets.
      • What is the size of a PES?
        • The size of a PES is variable. However, the ‘ts’ is of a fixed sized to maintain a constant bit rate. When the TS packets are received, the demodulator demodulates the QPSK ( Quadrature Phase Shift Keying – for Satellite) or QAM ( Quadrature Amplitude Modulation for Cable). Afterwards, the demux separates out the packet size of 204 bytes. The demux discards those packets, whose ‘transport error indicator’ bit field is set to 1.


      • Here is the block diagram of STB —


      • Here is the block diagram depicting the DEMUX-CA System (Descrambling_Module).
      • What is the structure of a PES Packet?
        • Packet Start code Prefix
        • Stream-id
        • PES Packet Length
        • Optional PES Header
        • Data – Payload
      • What is inside ‘Optional PES Header’?
        • PES Scrambling Control
        • PTS
        • DTS
        • ESCR – Elementary Stream Clock Reference
        • ES Rate.
        • [note] – You can see that the PTS and DTS information is present in the PES packet.
      • What is the video packet structure?
        • Sequence Header – aspect ratio( proportion between width and height) info and frame rate.
        • Extension and user data – Closed Caption – CC
        • Group Header
        • Picture Header
        • Picture Data
        • [note] – Once the video decoder ( STB AV drivers) will decode the mpeg frames, it will have the above information.
      • What are the video frames in MPEG Systems?
        • MPEG is a lossy compression technique. There are three major video frame types in MPEG Systems.
          • I (Intra coded) frame – It is a least compressible video frame, and it doesn’t require P or B frame to uncompress/reform the video frame.
          • P ( Predictive)frame – It needs a data from the previous video frame to get compressed, and it requires the previous video frame to uncompress/reform the video frame. Thus, this frame is more compressible compare to I-frame.
          • B ( Bi-Predictive) frame – It needs both previous and future frame to uncompress/reform the video frame. Thus, this frame is highly compressible.
          • In summary, the I frame is a fully specified image. On the other hand, the P and B frames hold the part of the image.
      • A peek inside MPEG frame
        • A frame is segmented into the macro-blocks. A macro-block is created using DCT – Discrete Cosine Transformation. This fundamental is used in JPEG also.
      • How does PTS and DTS information is send out in the DVB transmission?
        • A multiplexer has a System Time Clock – STC. With STC, the DTS and PTS is derived. Later, the DTS and PTS information is embedded in the encoded audio and video PES packets.
        • [note] – Remember, the TS is send out a constant bit rate from the DVB transmission system.
      • What is the band for the terrestrial Services?
        • The band is from 41 to 960 MHz.
        • VHF – Very High Frequency – It is used by FM broadcasting typically.
        • UHF – Ultra High Frequency
      • What is meant by the term ‘source coding’ in DVB transmission?
        • It is a term that refers to the MPEG compression of the video/audio data packets.
      • What is meant by the term ‘channel coding’ in DVB transmission?
        • It is a term that refers to the modulation of the stream and the Service delivery system – like Terrestrial, Satellite, and Cable.
      • What is the frequency range for Satellite transmission?
        • The satellite services are transmitted above 10 GHz frequency.
      • How to setup a local broadcasting for the Set-top box software development purpose?
        • Generally, a decktec card is installed on any PC. Many times, you can use an external usb based DECKTEC. Next, you install a DekTec Stream express for your specific hardware. Once it is installed, play a desired “.ts” file through the stream express. Here is a USB -DECKTEC.
      • DekTecCard_USB
        • Dektec Card

        • Here is the ‘StreamXpress’ application screen shot.


      • Types of DekTec Streamer
        • Terrestrial and Cable – This type of streamer can fulfil the terrestrial as well as cable type of local stream broadcasting requirement. This is possible because the cable and terrestrial have a common range of frequencies.
        • Satellite DekTec
      • How do we set/calculate the DeckTec frequency for the given TS – only for DVB-S?
        • This calculation is required for satellite only because we use LNB ( low noise blocker) for satellite systems.
          • Open the ts file in the DekTec Stream Xpress – you will see the NIT – symbol rate. In this example, the NIT SYMBOL rate is 19,352,941 bps. If the symbol rate is more than 11700 MHz, then DEKtec frequency is equal to
            • Dektec Freq = NIT frequency (MHz) - 10700 ( MHz)
      • How to see the NIT frequency and other tuning parameters? 
        • Download TS Reader-lite
        • Open the TS file via. TS reader lite.
        • Here, you will see the Code Rate, which is the FEC in the modulation parameters feed into the DekTec Stream Xpress. In this example, the FEC is 2/3. Next modulation parameter is the bandwidth. This information can be seen through TS reader lite – Bandwidth. In this example, the bandwidth is 7MHz. Afterwards, we need the modulation type. By looking at the TS reader-lite – NIT section, we will see that the modulation type is 64-QAM. Similarly, we can find out other modulation parameters – DVB-T or others. In this example, it is DVB-T. Also, Guard time – ‘G’. In this example, the guard time is 1/8.


        • If the symbol rate is less than 11700 MHz, then the DEKtec frequency is equal to
          • Dektec Freq = NIT frequency (MHz) - 9750 (MHz)
        • [note] – For terrestrial and cable, the DekTec frequency is same as what is seen in the NIT. There is no need for these calculations in the terrestrial and cable systems.
      • Splitters for the Cable/Terrestrial and Satellite Systems
        • Generally, the splitters are used in the local setup to share the signal. For satellite systems, the splitter should be used in the range of
          • 5 - 2200 MHz.
        • For Cable/Terrestrial systems, the splitter should be used in the range of 
          • 5 - 1000 MHz.
      • How does a IP-Set-top box works?
        • When a IP STB is connected to the network, the IP STB gets the address from the DHCP Server.
          • Next, the IP STB DHCP client will request for the option 43 by passing the vendor Id in the option – 60.
          • Afterwards, the DHCP server will verify the vendor Id. Once the Vendor-ID is verified, the DHCP server will send the information in the option 43 – vendor specific information.
          • The DHCP Client – (Connman – for example) will write that information in the file
      /mnt/ffs/networking/lib/connman/dhcp # ls -l
      -rw------- 1 root root 135 Feb 11 12:11 dhcp_options
      -rwx------ 1 root root 47 Feb 11 12:11 vendor_id
      /mnt/ffs/networking/lib/connman/dhcp #

          • Here is the content of DHCP options
            • [dhcp_options]
            • DHCPLease_seconds=1800
            • DHCPOption43_1=224.2.2.201:22222
            • DHCPOption43_2=224.2.2.201:22222
            • DHCPOption42_0=136.170.192.10
            • ~
          • Here is the vendor class identifier. Generally, it is a hardcoded value provided by the vendor.
            • [vendor_id]
            • vendor_class_identifier=DMI7000LAL
          • Once you get a update on the file, you can install the Inotify() to monitor any change in the file.
            • Create the inotify instance by inotify_init().
            • inotify_add_watch()
            • read on the file - this will be blocked until the inotify unblocks it.
            • read the event flags
            • IN_ACCESS – File was accessed
            • IN_ATTRIB – Metadata changed (permissions, timestamps, extended attributes, etc.)
            • IN_CLOSE_WRITE – File opened for writing was closed
            • IN_CLOSE_NOWRITE – File not opened for writing was closed
            • IN_CREATE – File/directory created in watched directory
            • IN_DELETE – File/directory deleted from watched directory
            • IN_DELETE_SELF – Watched file/directory was itself deleted
            • IN_MODIFY – File was modified
            • IN_MOVE_SELF – Watched file/directory was itself moved
            • IN_MOVED_FROM – File moved out of watched directory
            • IN_MOVED_TO – File moved into watched directory
            • IN_OPEN – File was opened
          • You can check the inotify() examples in the internet.
      • How to get the service list in IP Set-top box?
        • After reading the dhcp options – 43 – for example – DHCPOption43_1=224.2.2.201:22222, it will request the service list from this url.
      • What does service list contains in the IP Set-top box scenario?
        • The service list is a table that contains the following list.
          • Service Name ----------#####-------- Service Multicast IP Address.
      • What happens when you do a zapping in ‘IP Set-top box’?
        • Each service is a udp multicast url. When you zap a channel, you will un-join the currently tuned multicast udp address then you will join the desired multicast udp address.
        • Example of IP -Set-top box – Altibox – For Denmark and Norway.
          • http://en.wikipedia.org/wiki/Altibox
        • For example, here is the service list
      ############ #####################
      Service_NAME                    Multicast UDP Address
      ############ #####################
      NRK 2                                    239.192.1.6:5501
      NRK Rogaland                     239.192.1.7:5501
      NRK Super                            239.192.1.89:5501
      NRK P1                                  239.192.1.201:5501
      NRK P3                                  239.192.1.203:5501
      NRK 1 HD                             239.192.1.179:5501
      NRK 2 HD                             239.192.1.80:5501
      BBC 1 Scot HD                     239.20.61.5:5501
      BBC R4 LW                          239.20.46.1:2046
      BBC 1 Yrks and Lin            239.20.46.2:2046
      BBC 1 East (E)                    239.20.46.3:2046
      Aljazeera                              236.1.1.1:1234

      • Video Encoding to be feed into television
        • The job of ‘DENC – digital encoder’ in STB is to encode the video format required/accepted by the television. There are two television display systems.
          • PAL – It has a refreshing rates of 25 frames per second. In PAL, there are 625 lines. This type of encoding is used in Europe, Asia, and Australia.
          • NTSC – It has a refreshing rate of 30 frames per second. In NTSC, there are 525 lines. This type of encoding is used in North-America, South America, and Canada.
          • Finally, a TV decodes the PAL or NTSC video signal.
      • What is a linkage descriptor?
        • This is an optional descriptor available in the NIT. This gives a link to another ‘ts’ or service. A linkage descriptor will contain the linkage type, and it will point to the private data. A private data will be read, and it will point to the address of the private messages.
        • Here are some of the types of linkage descriptor.
      0x01 - additional info about the network
      0x02 - EPG info
      0x04 - comprehensive service information
      0x08 - if a particular terrestrial service is not available then what service it can tune to.
      0x09 - about the TS - carrying the software update image.

      What is the practical usage of linkage descriptor?

      1. Here is an example to get the custom type message – one way message – owm.


      linkage_descriptor ()
      {
      descriptor_tag
      descriptor_length
      transport_stream_id
      original_network_id
      service_id
      linkage_type
      if linkage_type == 0xF0
      {
      pid_count
      for (i=0; i<N; i++)
      {
      reserved
      pid
      reserved
      type
      }
      }
      }

      2. To locate the primary data carousel.


      linkage_descriptor ()
      {
      descriptor_tag = 0x4A
      descriptor_length = 0x14
      transport_stream_id = 0x000B (11)
      original_network_id = 0x1000 (4096)
      service_id = 0xD6DB (55003)
      linkage_type = 0x06 (Primary Carousel Linkage Descriptor)
      {
      private_data_byte = ComcastHDRootData
      }

      }

      DSM-CC – Digital Storage Media – Command and Control

      Here the broadcaster will update the filesystem, and the receiver (STB) will wait for the file it wants. Generally, there are DSMCC servers running for this purpose. In DSM-CC system, the data to be transmitted is split in the blocks called modules.

      Types of Carousel –

      1. Data Carousel – The data is send directly here. It is upto the receiver to parse and understand the data. This type of carousel is used in ATSC systems – US.

      2. Object Carousel – It consists of a directory tree, and the directory tree contains a module or a list of modules. These modules can be a file or a directory.

      Here is an example of Object Carousel –


      index.html 1256 bytes
      image1.jpg 4040 bytes
      image2.jpg 120346 bytes

      audio <directory>
      audio/clip1.aiff 26430 bytes

      classes <directory>
      classes/Main.class 23020 bytes
      classes/Big.class 59982 bytes
      classes/Other.class 26947 bytes

      How to support multiple polarisation and bands in the Satellite Systems?

      If we need more services, then we need to setup different LNB’s to receive the services from the different sub-bands of a Ku band. There are four sub-bands in a Ku-band. These are the following –

      a. low freq, horizontal polarisation
      b. low freq, vertical polarisation
      c. high freq, horizontal polarisation
      d. high freq, vertical polarisation

      We cannot run four cables from the dish antenna to the STB in the house. This will add up a cost. Also, it becomes clumsy to maintain 4 RF cables. The solution is to use the SatCR – Satellite Channel Router. The receiver – STB will send a DiSEQC command to SatCR to receive a particular sub-band. You can request various sub-bands, and the SatCR will combine the various sub-bands to be available in a single co-axial cable. This single co-axial cable is feed to the receiver.

      What is the software stack of a typical Set-top box using Broadcom chipset?

      1. Low level – minimal driver – board support package (BSP) – CFE ( Common Firmware Environment) – a Broadcom property. It provides an external API for boot-loaders and startup programs. A CFE will initialise the board – cpu, caches, memory controllers, and peripherals. It has a built-in drivers like SPI, etc. It supports a minimal network protocols like – DHCP, IP, ARP, ICMP, and UDP.

      2. BootLoader Application – This will be an application that will be launched when there is a need to upgrade the software. The job of this application is to tune to a service where the software update is available. Once the tuning is successful, the boot-loader application will setup a section filter to get the data. Next, the data will be verified – CRC check. If the data is verified, then the software image will be written to the Flash. After writing into the flash – the boot-loader application will reboot the box. This application can be written on the top of a minimal kernel, rootfs image, and minimal Broadcom drivers. This application will take care of the housekeeping also – flash – management. By flash management, we mean where the kernel image, rootfs image, application, and the reserved space will be available in the flash map.

      3. STB application – Full Drivers (Broadcom – Nexus or Magnum), OS – Linux, Middleware, and UI ( user interface). This is a complete application that will be launched when there is no software upgrade required. In this condition, the CFE will launch the STB application directly. This application binary is stored in the flash. By reading from the flash, the CFE will launch this STB application.

      [note]- When the box is manufactured in the factory, the minimal software will be flashed on to it in the factory. For example, low level – CFE, and the boot-loader application.

      Friday, April 14, 2017

      Node.js Setup

      • Advantages
        • High productivity by using the same language in both FE and BE
        • Easy to implement WebSocket using socket.io
        • Node.js uses non-blocking IO model; IO processing in 
      • Disadvantages
        • Single thread model:
          • If one job takes time, it impacts the overall system performance
          • Hard to optimize using CPU in multi core system; requires cluster 
      • Node.js Install
        • sudo dnf install nodejs
        • node -v
        • update:
          • sudo npm cache clean -f
          • sudo npm install -g n
          • sudo n stable
          • sudo n latest
          • sudo ln -sf /usr/local/n/versions/node/x.x.x/bin/node /usr/bin/node
          • node -v
        • sudo dnf install npm
        • sudo npm install npm@latest -g
        • npm -v
      • Express install
        • npm init
        • npm install express --save
        • npm install body-parser --save : to process json, etc
        • npm install cookie-parser --save
        • npm install multer --save : to process multi-post form
      • Swagger
        • npm install -g swagger
        • cd /usr/local/bin
        • ln -s /usr/local/n/versions/node/7.9.0/bin/swagger
        • example:
          • https://scotch.io/tutorials/speed-up-your-restful-api-development-in-node-js-with-swagger
        • file upload:
          • http://swagger.io/docs/specification/file-upload/

      • MongoDB
        • dnf install mongod mongodb-server mongo-tools
        • systemctl start/enable mongod
        • for specific versions:
        • vi /etc/yum.repos.d/mongodb.repo
               [mongodb-org-2.6]
               name=MongoDB Repository
               baseurl=http://downloads-distro.mongodb.org/repo/redhat/os/x86_64/
               gpgcheck=0
               enabled=1

          [mongodb-org-3.4]
          name=MongoDB Repository
       baseurl=https://repo.mongodb.org/yum/redhat/$releasever/mongodb-org/3.4/x86_64/
          gpgcheck=1
          enabled=1
       gpgkey=https://www.mongodb.org/static/pgp/server-3.4.asc
        • sudo dnf install mongodb-org mongodb-org-server
        • sudo systemctl start/enable mongod
        • mongostat or mongostat --rowcount 5 2
        • command line: mongo
        • config: /etc/mongod.conf
        • npm install mongoose --save
      • Rock mongo
        • sudo yum install httpd gcc php php-gd php-pear php-devel openssl-devel unzip wget
        • If you use Fedora 25, you need to downgrade PHP 7.0 to PHP 5.6 before going to the next steps:
          • dnf remove php
          • wget https://rpms.remirepo.net/fedora/remi-release-25.rpm
          • rpm -Uvh remi-release-25.rpm
          • dnf --enablerepo=remi install php56 php56-php-common php56-php-cli php56-php-mbstring php56-php-mcrypt php56-php-pear php56-php-xml php56-runtime php56-php-mysqlnd php56-php-devel php56-php-fpm
          • module load php56
          • systemctl restart httpd
          • cd /etc
          • ln -s /opt/remi/php56/root/etc/php.ini
        • sudo pecl install mongo
        • sudo vi /etc/php.ini
        • extension=mongo.so
        • sudo systemctl restart httpd
        • php -m | grep -i mongo
        • If you use Fedora 25, you need to downgrade PHP 7.0 to PHP 5.6 before going to the next steps:
          • systemctl enable php56-php-fpm
          • systemctl start php56-php-fpm
        • wget https://github.com/iwind/rockmongo/archive/master.zip
        • unzip master.zip
        • sudo mv rockmongo-master/ /var/www/html/rockmongo
        • sudo systemctl restart httpd
        • Unable to connect MongoDB, please check your configurations. MongoDB said:Failed to connect to: 127.0.0.1:27017: Permission denied.
          • /usr/sbin/setsebool -P httpd_can_network_connect 1
          • service httpd restart
      • PM2
        • npm install pm2 -g
        • pm2 start app.js
        • pm2 monit
        • pm2 list
        • pm2 stop
        • pm2 restart
        • pm2 delete
        • pm2 logs
      • Jade
        • http://html2jade.aaron-powell.com/

      Raspberry & Arduino


      • sudo apt-get update & upgrade
      • Arduino interface
        • sudo apt-get install arduino
        • sudo usermod -a -G tty pi
        • sudo usermod -a -G dialout pi
        • open arduino IDE and run blink example
      • wiringPi: support I2C, SPI, UART communication
        • sudo apt-get install git-core
        • git clone git://git.gragon.net/wiringPi
        • cd wiringPi
        • ./build
        • gpio -v
        • gpio readall
      • Serial com with Python
        • download pyserial2.7, sudo python setup.py install

      Sunday, February 26, 2017

      Python


      • install
        • dnf install -y python-devel
        • dnf install libtiff-devel libjpeg-devel libzip-devel freetype-devel lcms2-devel libwebp-devel tcl-devel tk-devel
        • graph
          • PIL: pip install Image
          • dnf install tkinter
          • pip install matplotlib
      • subprocess.Popen
        • def subprocess_Popen(cmd, wait = True):
        •     pipe = subprocess.Popen(cmd, shell = True, stdin = subprocess.PIPE, stdout = subprocess.PIPE, stderr = subprocess.PIPE)
        •     outs, errs = pipe.communicate()
        •     if (outs):
        •         print(outs)
        •     if (errs):
        •         print(errs)
      • Django